
Stucco has long been a favorite material for homebuilders because it is durable and decorative. Applying it to masonry adds a layer of energy efficiency and safety to any structure.
Stucco can provide crisp and clean curb appeal to an exterior and is easy to apply.
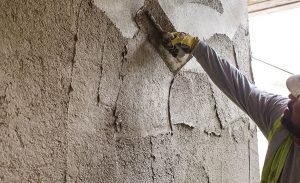
It contains a mixture of cement, sand, lime and water. Once stucco dries it may be painted any color.
Stucco works well as a modern home finish, and it can be made into a variety of textures.
Some stucco styles include pebbled, smooth, swirled, course and more. There is minimal maintenance with this type of exterior covering and a reduced risk of cracking because it expands and contracts in varying weather elements.
Stucco that has been waterproofed is resistant to rotting from mold and mildew. You can expect the cement mixture to last as many as 50 years on your home without the need to update it.
Installing stucco takes about 48 hours to complete, including drying time. The process is quick because the material is so versatile and can work on multiple materials, even wood.
Choose stucco over brick if you wish to paint and update the style throughout the decades.
Below are the steps for how to apply stucco.
Don’t forget to check out our Stucco Pumps and Concrete Mixers to get the job done QUIKLY!
How To Apply Stucco To Concrete
*When you begin, start at the rear or lesser-visible parts of the building so you can work to perfect your technique as you go.
- Prepare the surface you will be putting it on. It may be applied to anything rigid or solid, but to apply it directly, make sure the surface is rough and absorbent. You will need to wash the surface evenly if the wall does not absorb water — even a little bit. There cannot be surface contamination so make sure it’s clean. Walls covered in a sealant or paint need to be acid-etched, sandblasted, roughed or given an adhesive agent. Avoid water-soluble paint.
- Add moisture to the surface just before applying the first coat. Use a sprayer for the best means of adding moisture. Make sure it is wet but don’t soak it.
- Make sure you are in average temperatures before doing stucco work. It cannot be freezing or excessively hot to do this process because the drying process will take longer.
- Make your scratch layer by adding together one part cement with lime and 2¼ to 4 parts sand. The easiest to mix and work with is plastic cement premixed with lime. You will want to add gypsum sand from a dry material.
- To provide adhesion for the next layer, mark the scratch layer by spreading on a ¼-inch thick layer. Use a palette with slots to mark the surface with horizontal lines — keep the tool perpendicular to the wall.
- You will need to release the air from the scratch coat by hitting it with a gunner or shaking it with a fiber brush. This will help create a more resistant adhesion.
- Wait a few hours and apply the brown coat. You do not need to wait for the scratch coat to completely dry if you are using modern cement on a rigid surface. Spread the second “brown” layer when the scratch coat is rigid enough to fight against cracking. This is about 4-5 hours after application. Go ahead and soften the surface until it is level. It should be ¼ inch thick at this point.
- Over the two-day period make sure the humidity is maintained. If air humidity drops below 70 percent, moisten the surface one to two times per day by spraying it. In this instance you should wait one week for the brown coat to dry but moisten it periodically if you notice it drying prematurely.
- Finally, apply the decorative layer, which is one-part cement and one-half to 3-parts sand. Allow it to dry completely and then coat it with your paint color of choice. Everything should be completely dry before you paint.